Explorer
Now that you’re in good shape to use the MFG Data Model API, we can start experimenting with the queries and the Explorer to get more comfortable with this new service.
In this section, we’ll introduce you to the interface that will help you explore your design data, focusing mainly on the API. As said before, we don’t want you to worry about frameworks, coding, and cloud providers. We can keep it simple using the Explorer.
The Explorer’s UI was built to be simple and intuitive. We’ll use it mostly to perform our queries by passing the payload and checking the response, just like in the image below:
The Explorer is built on top of the graphiql project! If you want additional details on this project, feel free to check its documentation 😉
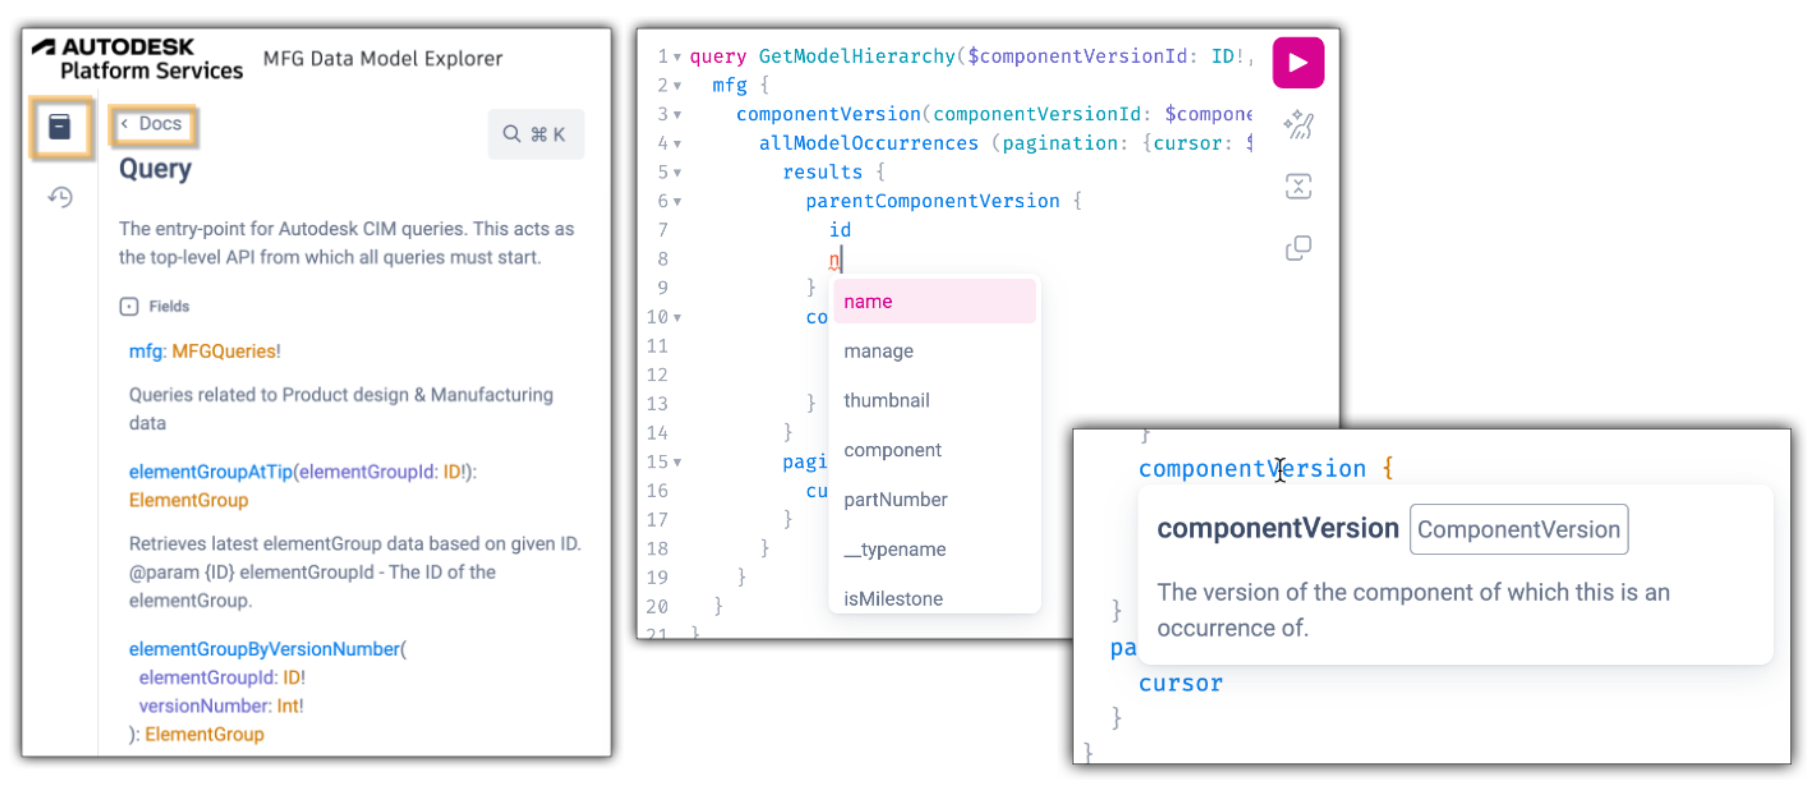
It also comes with multiple functionalities to check the history of queries, format queries, configure themes and shortcuts, and a button to display the queries available with the API. This last option is the first one we’ll go through, as it provides us access to our API schema. This will be our entry point. We’ll start our journey by getting familiar with the MFG Data Model API schema.
The UI also provides auto-complete, error checking and in-editor access to documentation:
MFG Data Model Schema
As described at graphql.org:
“Every GraphQL service defines a set of types which completely describe the set of possible data you can query on that service. Then, when queries come in, they are validated and executed against that schema.”
Our API has a schema suitable to address the common data from the MFG industry. The main objects are described below:
- DesignItem: Represents an item that contains a product design. You could think of it as the file in your project.
- DesignItemVersion: A specific version of a design.
- Component: Component is the way you can organize your model into parts. Each design has a root component, and each component can have multiple sub-components.
- ComponentVersion: A specific version of a component.
- Occurrence: An instance of a component inside another component.
- Properties: Custom properties of a ComponentVersion.
- PhysicalProperties: Physical properties of a ComponentVersion: area, volume, density, mass and bounding box.
- Derivatives: Export file formats that can be requested for a ComponentVersion: STEP, STL or OBJ.
- ManagePropertiesOnVersion: Lifecycle information related to the ComponentVersion: itemNumber, lifeCycle, etc.
Explorer Docs
Now let’s use the Explorer to view our schema.
Log in with your Autodesk account, then click on the Docs button and scroll down to access the queries available in the MFG Data Model’s schema.
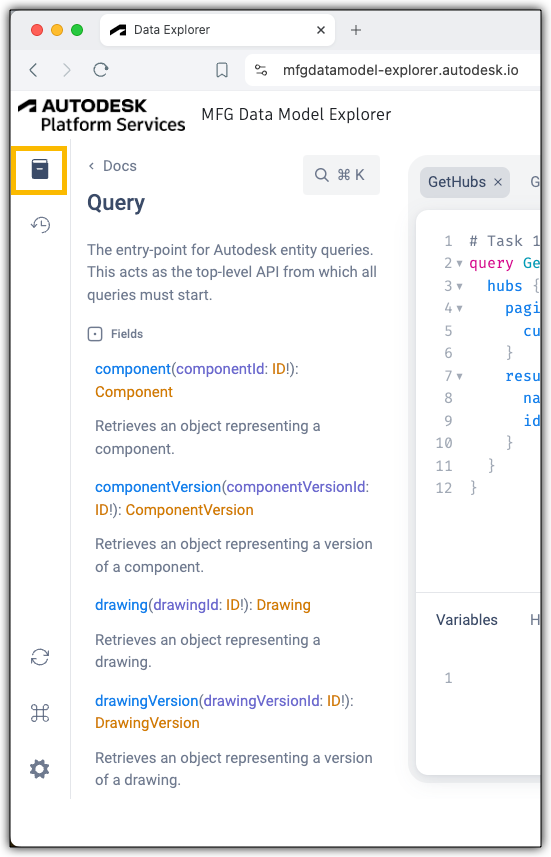
The first query we used in the previous section returned to us a list of hubs. According to this documentation we could, for instance, use a filter to retrieve only the hubs matching certain conditions. Exploring the schema gives us a better idea about the capabilities of the API. If you scroll down you’ll see a list of all the queries available including the parameters that can be passed to compose the responses.
GraphQL Voyager
There’s also another great tool to explore GraphQL API schemas: The GraphQL Voyager
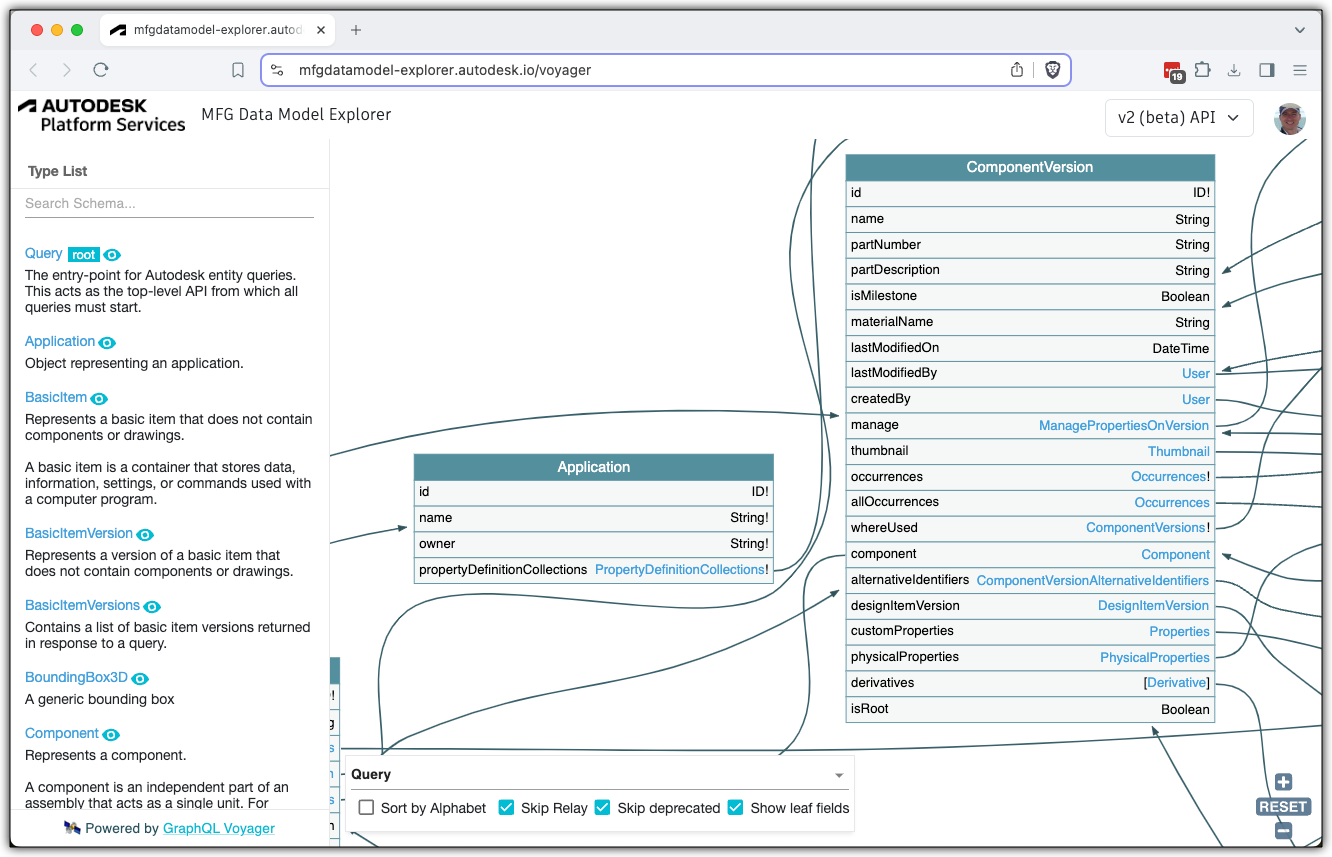
With that you will be able to inspect all the available queries and constructs from MFG Data Model API.
Keep one tab with the schema open for further exploration throughout this tutorial 😉
Now that we know the schema’s importance and know how to view it using the Explorer, we can continue with the subsequent queries.
First Queries
We suppose that you’re familiar with how the data is organized in the context of Fusion hubs but if not, here is a quick overview:
At the top level, there are the hubs. Inside each hub, there are the projects. Inside a project, there are multiple folders. Inside a folder, there can be other folders or items. Lastly, an item can have multiple versions.
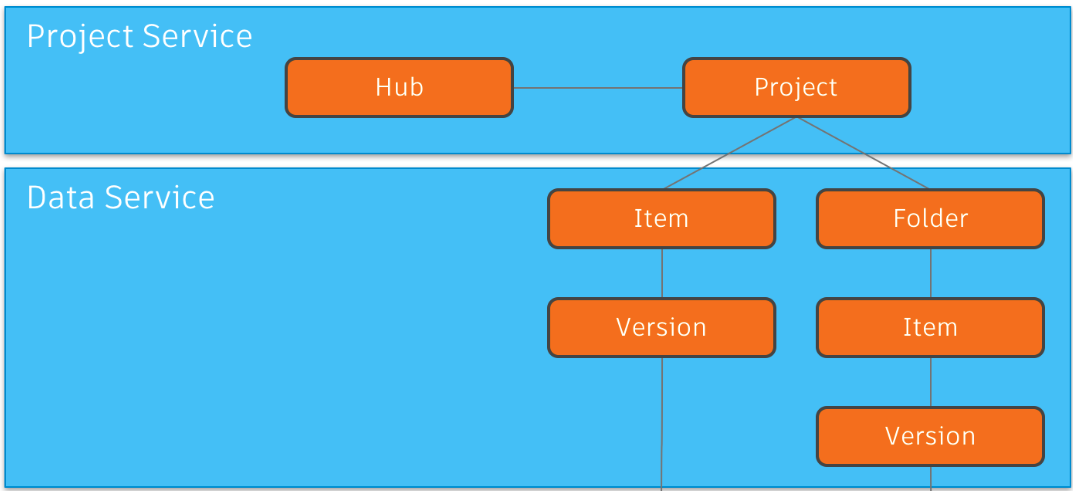
Let’s traverse this structure through our queries in 4 steps:
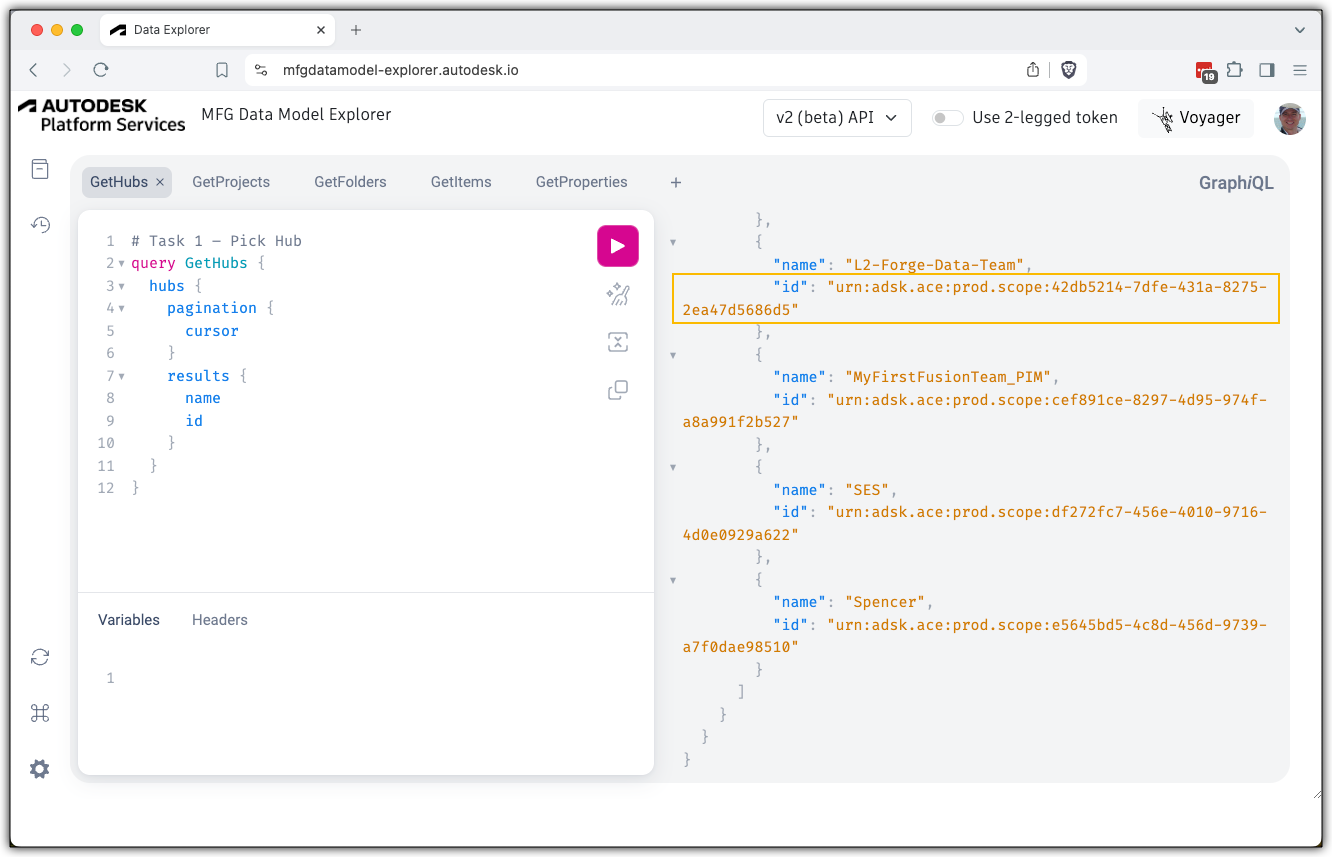
Step 1 - Listing the hubs
The query to retrieve the hubs is quite simple and it is available in the first pane of the Explorer. To list the hubs available you just need to click in the first panel of the Explorer and then run the query, like the image below:
In the next query, you’ll need to use your hub id as input.
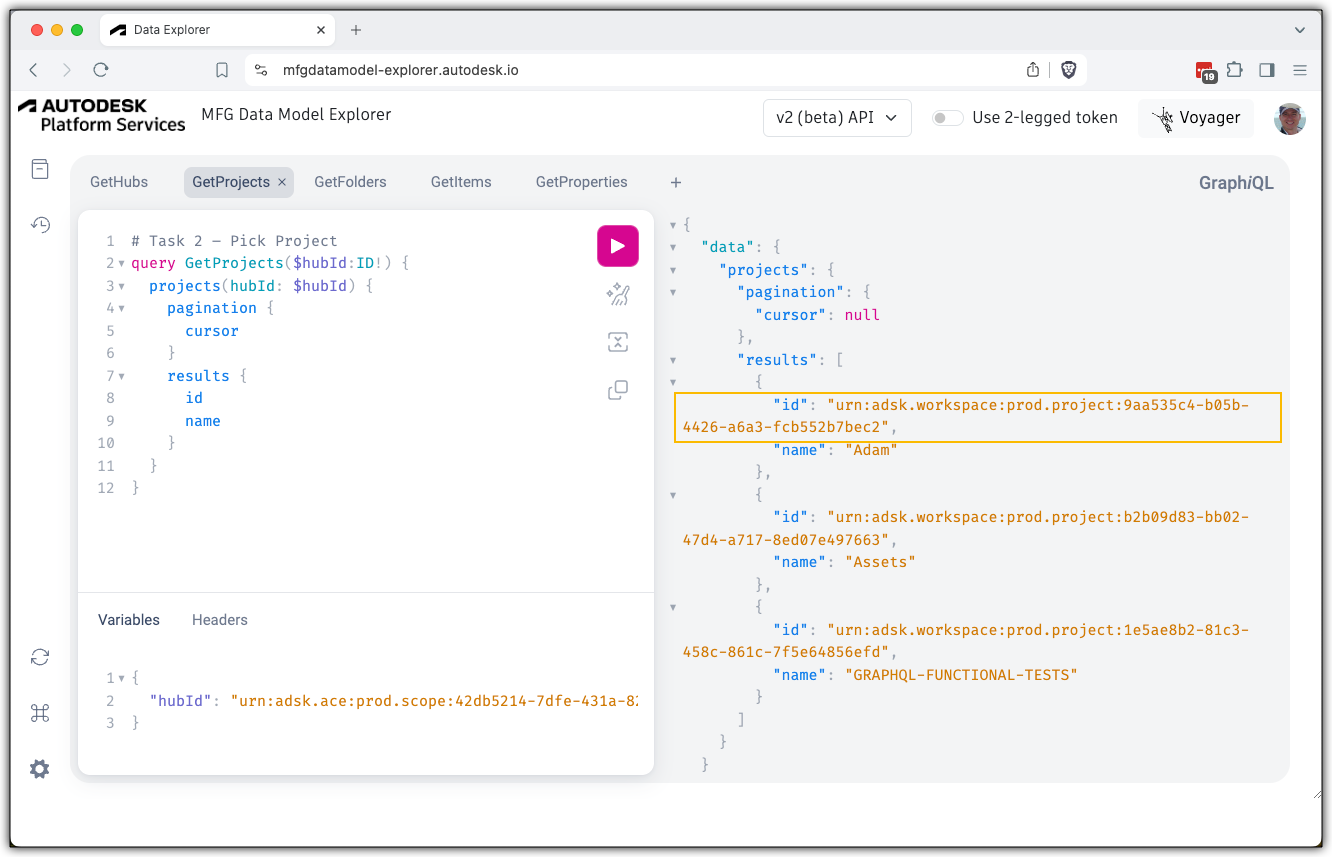
Step 2 - Listing the projects
Following the hierarchy, we’re going to list all of the projects available inside one hub. For that, we’ll need to provide the hub id as input for the GetProjects query.
Go ahead and copy the id of the hub you’re using, move to the GetProjects pane, and paste the id in the proper field in the Variables section, just like in the image below:
query GetProjects ($hubId:ID!) {
  projects(hubId: $hubId) {
    pagination {
      cursor
    }
    results {
      id
      name
      alternativeRepresentations{
        externalProjectId
      }
    }
  }
}
And in Variables space, the id of the hub:
{
  "hubId": "YOUR HUB ID HERE!"
}
This way is better to address variables as they can be assigned multiple times at any place in the query, and we don’t need to change any value in the query to point to a different hub.
In case your hub has many projects making the one you need to use missing from the first page (or even hard to find), there’s a way to filter the response.
For that you can filter the projects by name, passing the name of your project like in the image below:

For simplicity, you can just copy and paste the query below if needed (replacing it with your project name and hub id) 😉
query GetProjects ($hubId:ID!, $projectName:String!) {
  projects(hubId: $hubId, filter:{name:$projectName}) {
    pagination {
      cursor
    }
    results {
      id
      name
      alternativeIdentifiers{
        dataManagementAPIProjectId
      }
    }
  }
}
{
  "hubId": "YOUR HUB ID HERE!",
  "projectName": "YOUR PROJECT NAME HERE!"
}
The next query requires a project id, and MFG Data Model API works with its unique value for the project id. That’s why it exposes the usual project id inside the alternativeIdentifiers field. We are not going to use the alternative representation for the projects in this tutorial but it is always good to know how to retrieve it. You’ll need it if you want to connect with Data Management APIs, for instance.
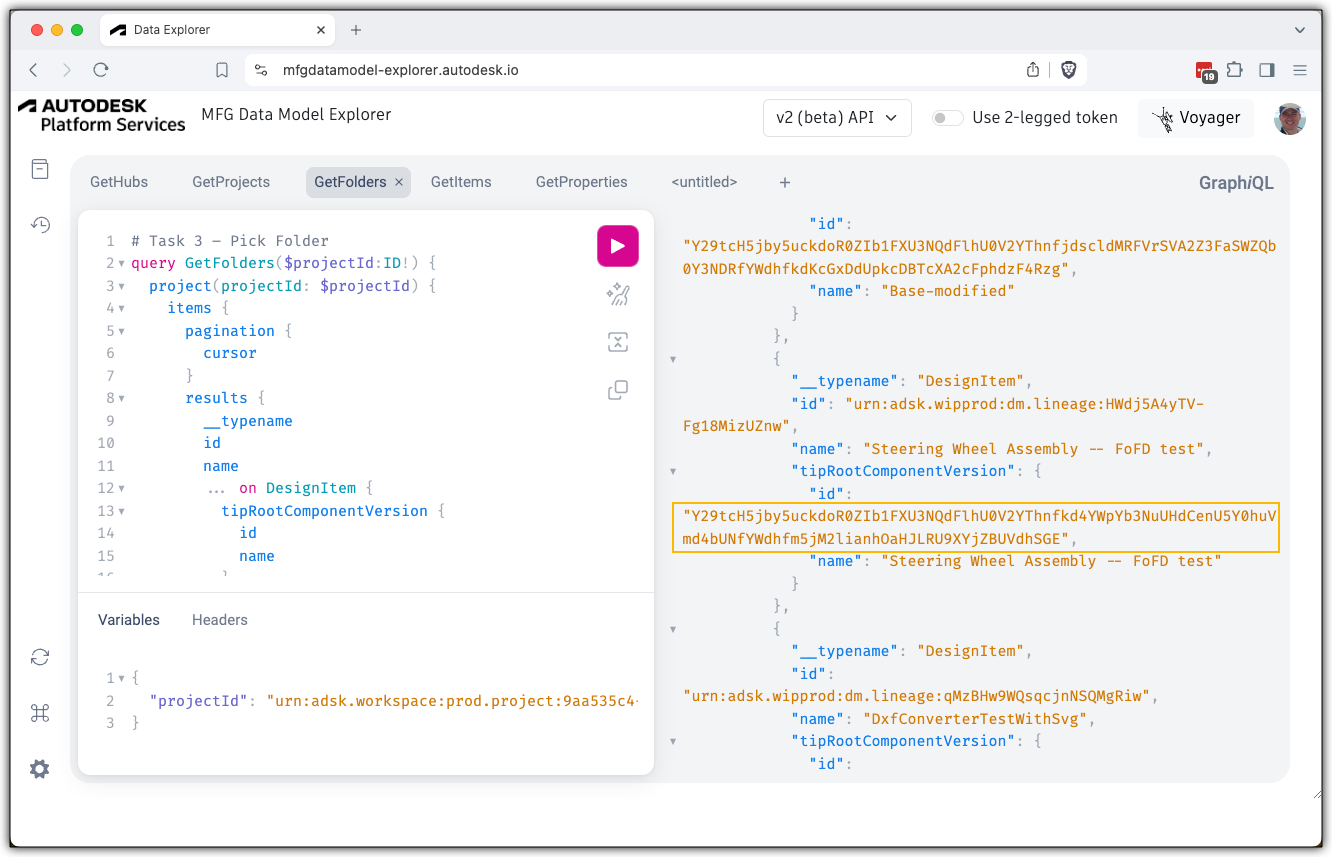
Step 3 - Listing Designs
We can either use one of the designs in the root folder of the project or find the folder it resides in. First use the GetFolders tab in the Explorer to see if your design is there. We are also using the __typename field which makes it easier to see what kind of object was returned by the items field: could be BasicItem, ConfiguredDesignItem, DesignItem or DrawingItem.
query GetFolders($projectId:ID!) {
  project(projectId: $projectId) {
    items {
      pagination {
        cursor
      }
      results {
        __typename
        id
        name
        ... on DesignItem {
          tipRootComponentVersion {
            id
            name
          }
        }
      }
    }
    folders {
      pagination {
        cursor
      }
      results {
        name
        id
      }
    }
  }
}
{
  "projectId": "YOUR PROJECT ID HERE!"
}
If your design is in one of the folders then copy the id of that folder from the response and use it in the next query available on the GetItems tab:
query GetItems($projectId:ID!, $folderId:ID!) {
  folder(
    projectId: $projectId,
    folderId: $folderId) {
    folders {
      pagination {
        cursor
      }
      results {
        __typename
        id
        name
      }
    }
    items {
      pagination {
        cursor
      }
      results {
        __typename
        id
        name
        ... on DesignItem {
          tipRootComponentVersion {
            id
            name
          }
        }
      }
    }
  }
}
{
  "projectId": "YOUR PROJECT ID HERE!",
  "folderId": "YOUR FOLDER ID HERE!"
}
Now you should be able to spot the design you are interested in so you should copy its root coponent’s id from the response under tipRootComponentVersion.
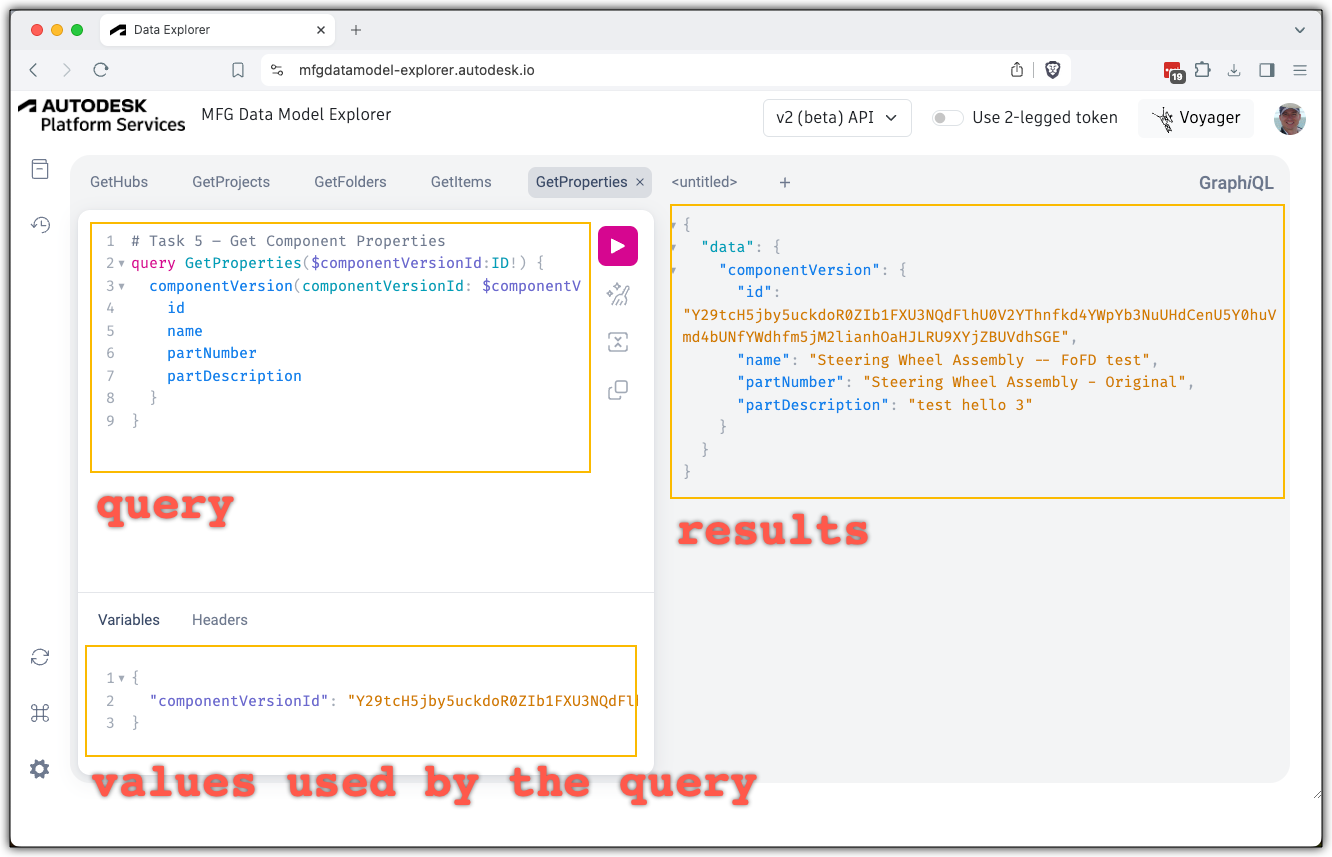
Step 4 - Get Design Properties
Now that we have a component version id we can get all sorts of information, as you’ll see in the following tutorials. This time just use the query on the GetProperties tab
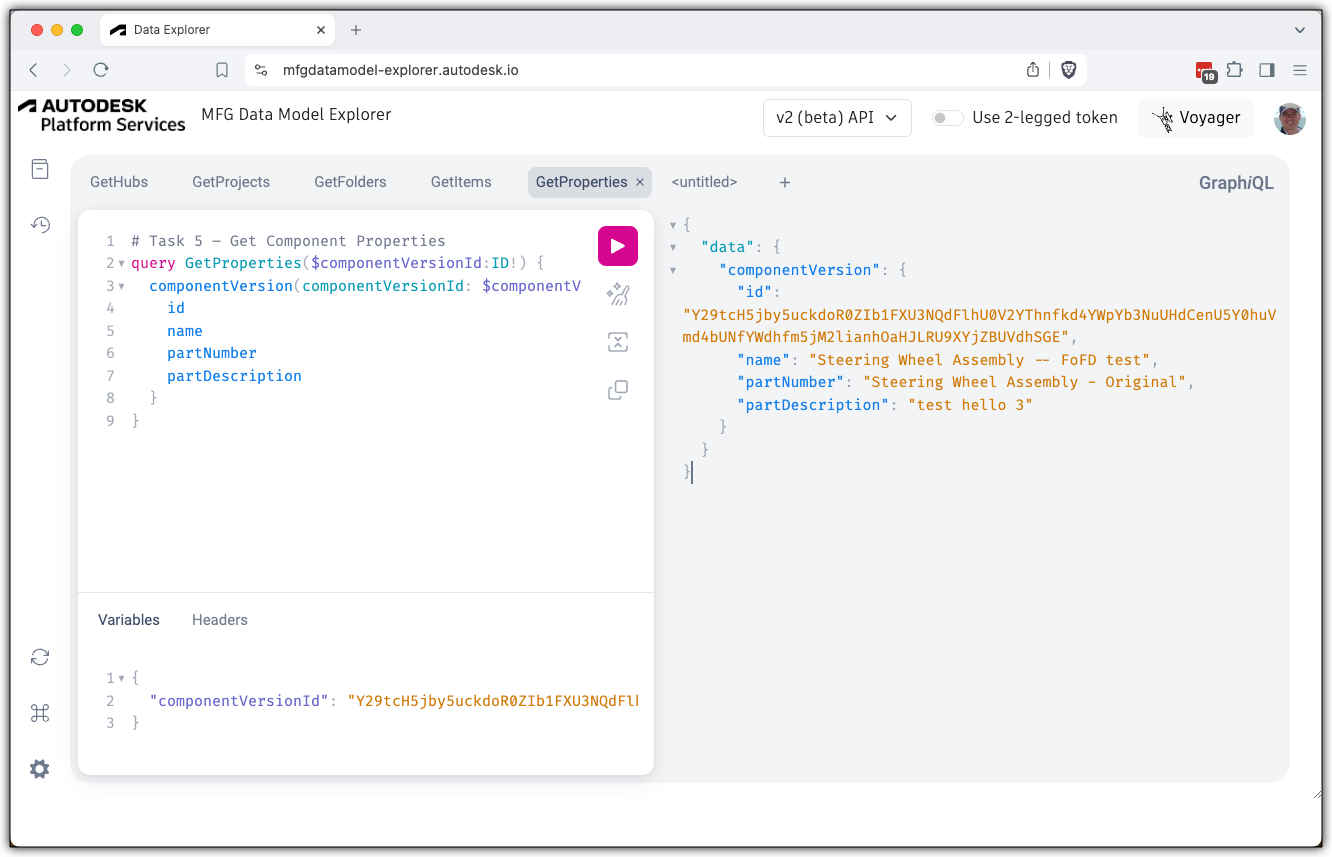
query GetProperties($componentVersionId:ID!) {
  componentVersion(componentVersionId: $componentVersionId) {
    id
    name
    partNumber
    partDescription
  }
}
{
  "componentVersionId": "YOUR COMPONENT VERSION ID HERE!"
}
And with that, we covered the first queries with the MFG Data Model API. In the next step, we’ll explore some other queries.